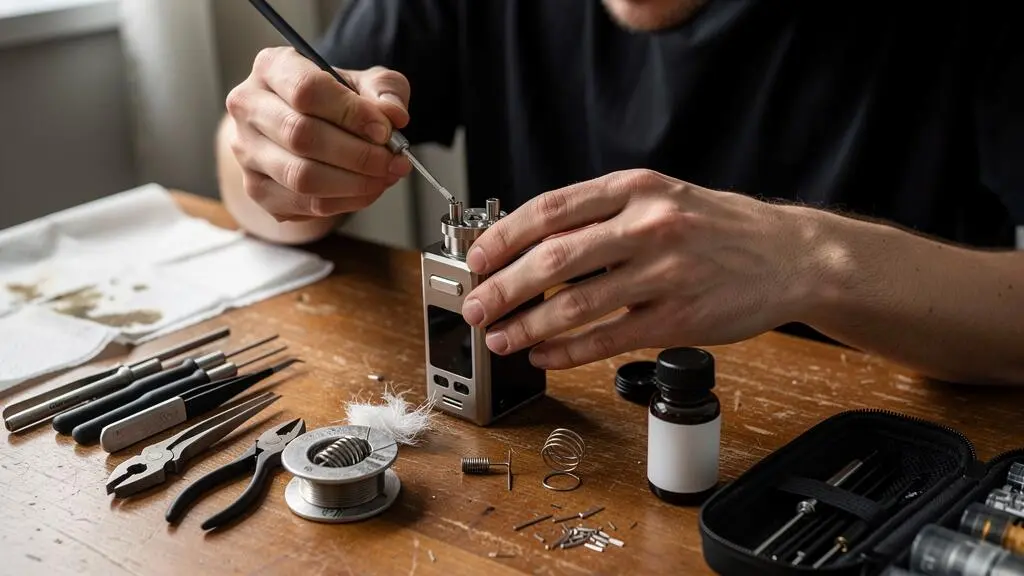
A practical rebuildable vape toolkit needs more than a pair of pliers and a screwdriver. For experienced adults maintaining rebuildable dripping atomisers (RDAs) or rebuildable tank atomisers (RTAs), the essential equipment covers five tasks: forming coils, securing wire, trimming excess material, positioning components and checking electrical resistance.
The difficulty is not simply making a coil fit. A protruding wire end, damaged post screw or displaced coil can create an electrical fault. Poorly prepared cotton can also interrupt liquid delivery and expose the wick to excessive heating. Having the correct tools available makes inspection and maintenance more controlled, although no toolkit can compensate for an incompatible build or unsafe battery handling.
A sensible collection therefore starts with precision cutters, correctly sized screwdrivers, tweezers, a coil-forming jig and a suitable resistance reader. Wick scissors, a clean work surface and organised storage complete the basic setup. The right balance between a compact case and a more extensive kit depends on how often the atomiser is rebuilt, how many decks are maintained and whether the user prefers making coils or installing prebuilt ones.
Rebuildable vape toolkit essentials
- Prioritise accurate wire cutting, secure coil positioning, compatible screwdrivers and reliable resistance measurement before buying additional accessories.
- Inspect coil clearance, electrical connections and resistance with the device inactive before any controlled functional check. Never work on an energised deck.
- Choose a compact, full or modular toolkit according to rebuild frequency, deck variety and maintenance habits rather than the number of accessories supplied.
- Why Do Rebuildable Atomisers Need More Than Standard Household Tools?
- How Do You Use a Rebuildable Toolkit Without Damaging the Coil or Deck?
- Compact or Full Rebuildable Toolkit: Which Better Suits Your Routine?
- Which Rebuildable Tool Mistakes Can Damage a Coil or Cause a Short?
- When Should Rebuildable Vape Tools Be Replaced Rather Than Reused?
- Custom Coil or Premade Head: Which Better Fits Your Maintenance Preferences?
- How Do You Wick an RDA Without Causing Dry Hits or Excess Leaking?
- Are RTAs Practical for Experienced Vapers Who Want Fewer Refills?
Why Do Rebuildable Atomisers Need More Than Standard Household Tools?
Rebuildable atomisers benefit from precision tools because their wire connections, post screws and coil clearances leave little room for handling errors. Correctly sized screwdrivers, sharp cutters and suitable tweezers help protect delicate components. Household tools can work when appropriately sized and clean, but oversized or worn equipment makes controlled assembly more difficult.
A rebuild involves three distinct mechanical functions: cutting, gripping and torque control. Flush cutters remove excess wire close to a terminal. Tweezers support positioning without crushing delicate wraps. A screwdriver matching the screw head applies controlled force without damaging its recess.
General-purpose pliers may be too large to reach a compact build deck. Household side cutters can leave protruding wire if their cutting edges cannot approach the terminal. Incorrect screwdriver sizes may slip or round a post screw, especially after repeated maintenance.
The Coil Master DIY Kit V3 component list illustrates the equipment commonly assembled for this work. It includes diagonal pliers, needle-nose pliers, ceramic tweezers, screwdrivers, a coil-forming kit and a 521 Mini V2 resistance-reading device. This establishes what one integrated kit contains, not that every component is essential for every build.
Cleanliness also matters. Tools previously exposed to workshop lubricants, metal filings or other residues should not contact cotton or heating wire without appropriate cleaning. Dedicated equipment can make it easier to maintain a consistent cleaning routine, although clean, suitable general-purpose tools are not inherently unsafe.
Insulated grips improve handling, but they do not make it safe to manipulate a powered atomiser. Sharp wire offcuts should be collected immediately, and eye protection is sensible when cutting springy wire that may move unexpectedly.
A well-chosen toolkit reduces avoidable handling problems. The next consideration is using those tools in a repeatable sequence that protects both the coil and its mounting hardware.
How Do You Use a Rebuildable Toolkit Without Damaging the Coil or Deck?
Use a rebuildable toolkit in a controlled sequence: isolate the power source, prepare the coil, secure its legs, trim excess wire, inspect clearances and verify resistance before applying power. Avoid excessive screw pressure and unnecessary coil manipulation. A consistent process protects the deck more effectively than repeatedly adjusting components after assembly.
A coil jig helps maintain a consistent internal diameter and even spacing while wrapping compatible resistance wire. Preparing approximate leg lengths before installation also limits the amount of bending required once the coil is mounted.
For the mechanical assembly, a practical order is:
- Remove or positively isolate the atomiser from its power source, then prepare a clean, stable work surface.
- Check the deck, post screws and insulating components for visible damage.
- Form the coil using a suitable jig, or select a compatible prebuilt coil.
- Position the legs in their intended terminals and tighten the screws gradually with the correctly sized driver.
- Trim protruding ends, inspect coil clearance and check resistance using appropriate equipment before any powered test.
Post screws should be secure without being forced. A slight additional turn may sometimes be appropriate after initial contact, but there is no universal quarter-turn rule. Screw material, clamp geometry and manufacturer specifications differ. If a screw spins without securing the wire, slips repeatedly or shows damaged threads, stop rather than applying more force.
Manufacturer guidance takes precedence over general building habits. The SvoëMesto Kayfun Lite instruction manual, for example, specifies that the coil must remain clear of the build deck and that excess wire ends must be cut flush with the terminals. Its electrical limits and positioning dimensions apply to that particular atomiser, not to rebuildable devices universally.
Some builders use brief electrical pulses to inspect heating behaviour or correct uneven heating. This is not a universal requirement: it depends on the wire material, the device and manufacturer instructions. Temperature-control materials and certain alloys must not be treated as interchangeable with wire intended for conventional heating checks. Prolonged dry heating can also deform coils and alter their condition.
Before inserting cotton, complete a visual dry-fit inspection and confirm the resistance reading is stable and compatible. If a powered diagnostic is permitted by the equipment manufacturer, it should be performed only with suitable protection and without touching conductive components. Any adjustment requires the device to be inactive again.
Once the handling method is established, choosing the size of the toolkit becomes easier: the necessary tools are those that support that method reliably.
Compact or Full Rebuildable Toolkit: Which Better Suits Your Routine?
A compact rebuildable toolkit usually suits an experienced user maintaining one or two familiar atomisers, particularly when portability matters. A full kit is more useful when rebuilding several deck designs or regularly working with different wire types. A modular collection offers a middle option: start with essential equipment and expand only when a specific maintenance task requires it.
Tool quality and compatibility matter more than case size. A small kit containing accurate cutters, suitable screwdrivers and a reliable resistance reader can be more useful than a large collection with poorly matched components.
The following comparison focuses on typical use patterns rather than assuming that all products within a category have identical contents.
| Decision factor | Compact toolkit | Full toolkit |
|---|---|---|
| Rebuild frequency | Occasional maintenance of familiar setups | Frequent rebuilds and adjustments |
| Atomiser variety | One or two compatible deck designs | Several decks with different screws and coil arrangements |
| Portability | Small case with selected essentials | More storage space and a wider tool range |
| Wire preparation | Basic cutters, a jig and limited accessories | Potentially more forming tools, cutters and measuring accessories |
| Workspace organisation | Requires deliberate storage of small components | May provide dedicated compartments for tools and consumables |
| Expansion | Additional tools may be purchased individually | Often covers more tasks from the outset |
Compact kits can sacrifice cutting-edge quality, tweezer precision or organised storage, although those limitations depend on the specific product rather than its size. Check the actual inventory before assuming that an ohm reader, ceramic tweezers or a particular screwdriver size is included.
A custom collection is a credible alternative. A suitable resistance reader, good flush cutters, correctly sized drivers and reliable tweezers address the main inspection and assembly tasks. Cotton scissors and coil jigs can be added according to need.
Buying individual tools is not necessarily cheaper. Its advantage is selective quality and compatibility, while a complete kit may be more convenient where most supplied components will genuinely be used.
Modular storage also avoids treating the first purchase as permanent. A compact zip case with room for replacement bits and consumables can grow alongside the number of atomisers maintained.
Whatever the size, the toolkit should make inspection easy. Electrical faults and damaged coils are more closely connected to handling and assembly errors than to the number of accessories in the case.
Which Rebuildable Tool Mistakes Can Damage a Coil or Cause a Short?
The most consequential rebuildable-tool mistakes include leaving wire ends protruding, damaging post screws, deforming coils and overlooking contact between conductive components. An unstable or unexpectedly low resistance reading may indicate an electrical fault. Preventing shorts requires visual inspection, intact insulation, compatible coil construction and electrical checks before the atomiser is operated.
Dull cutters can flatten or nick wire instead of producing a clean cut. Excessive pressure from pliers can distort the coil, while uneven leg positioning may bring a wrap or exposed wire into contact with the deck, chamber or other conductive surfaces.
Particular attention belongs to three physical areas:
- Terminal connections: wire should be secured without loose strands or protruding ends that could contact unintended conductive parts.
- Coil clearance: the installed coil must remain separated from surfaces that the manufacturer requires it not to touch, including the deck and surrounding chamber.
- Insulating components: damaged or missing insulators can compromise electrical separation between parts of the atomiser.
A wick resting on the deck is not, by itself, an electrical short because ordinary cotton is not a metallic conductor. The electrical concern is the position of conductive wire and hardware. Excessive wick material can instead contribute to liquid-flow problems or interfere with proper assembly.
The UK government advice on e-cigarette battery safety recommends following manufacturer instructions, preserving built-in safety features and preventing batteries from contacting metal objects. The guidance concerns battery safety generally rather than establishing a rebuild-specific assembly standard.
Resistance drift is another warning sign. A build may show an acceptable reading on a standalone meter but display a different value after installation on the intended device. Differences may arise from connections, measurement characteristics or mechanical movement. A significant or unstable discrepancy should be investigated before use rather than treated as normal.
Metal tweezers should never contact an energised coil or deck. Ceramic-tipped tweezers are designed for particular heating-related applications, but their presence does not remove the need to follow device instructions or isolate power before making adjustments.
Similarly, locking a regulated mod is not always equivalent to electrically isolating the atomiser. Where possible, disconnect the atomiser or otherwise follow the manufacturer’s specified safe maintenance procedure.
Five checks before returning a rebuilt atomiser to service
- Inspect the deck: confirm screws, posts and visible insulators are intact; the result is a deck with no observable mechanical damage.
- Check the coil position: inspect clearance around the coil and its legs; the result is no unintended conductive contact.
- Check the wire ends: use suitable cutters to remove protruding material; the result is clean terminal connections without exposed excess wire.
- Measure resistance: use a suitable reader and compare with the intended device where supported; the result is a stable reading within the relevant manufacturer’s limits.
- Complete the final inspection: confirm the chamber fits without touching the coil and that no tools or offcuts remain; the result is a fully inspected, inactive assembly ready for the manufacturer’s prescribed operating checks.
If a defect cannot be corrected without forcing, bending or repeatedly reheating components, replacing the affected part is more appropriate than trying to preserve an unreliable build.
When Should Rebuildable Vape Tools Be Replaced Rather Than Reused?
Replace rebuildable tools when wear prevents accurate, controlled operation or when corrosion, contamination or physical damage cannot be corrected safely. Cutters that crush wire, tweezers with misaligned tips and screwdriver bits that slip are practical warning signs. Reusable tools should be inspected regularly, while cotton and other single-use consumables require replacement according to their condition.
A fixed replacement calendar is less useful than checking tool performance whenever the case is opened. Rebuild frequency, materials and storage conditions affect wear differently.
| Tool or material | Warning sign | Appropriate response |
|---|---|---|
| Flush cutters | Blades crush, slip or leave irregular wire ends | Replace or professionally service if the design permits |
| Ceramic tweezers | Chipped ceramic, loose tips or damaged alignment | Replace damaged tips or the entire tool |
| Precision screwdrivers | Rounded bits, slipping or repeated cam-out | Replace the worn bit or screwdriver |
| Coil jig | Bent shaft, damaged surface or poor fit | Replace the affected component |
| Wick scissors | Blunt blades that pull or tear cotton | Clean, sharpen appropriately or replace |
| Organic cotton | Previously used, contaminated or degraded material | Discard and use fresh material |
Worn equipment can create defects that resemble problems with resistance wire or atomiser design. A dull cutter may leave a weak or irregular wire end, while misaligned tweezers make precise positioning harder. Tool condition should therefore be checked before repeatedly rebuilding an otherwise familiar setup.
Routine cleaning can extend the service life of durable tools. Remove accessible residue using methods compatible with the tool material, dry components thoroughly and prevent corrosion during storage. Avoid leaving cleaning residues on surfaces that will subsequently contact heating wire or cotton.
Tools used with different e-liquids may retain flavour residues, particularly around joints and textured grips. Cleaning is generally preferable to replacement where the tool remains structurally sound and can be adequately cleaned. Persistent contamination or corrosion is a different matter.
Consumables and tools have different service lives. Cotton is replaced rather than washed and reused as a wick. Coils may sometimes remain serviceable through multiple wick changes, but visible damage, unstable resistance or significant deformation warrants replacement rather than continued use.
Once the equipment is dependable, the larger maintenance decision concerns whether making custom coils remains worthwhile compared with using prebuilt coils or replaceable heads.
Custom Coil or Premade Head: Which Better Fits Your Maintenance Preferences?
Custom coils suit experienced users who want control over coil geometry, materials and maintenance, and who are comfortable with the necessary electrical checks. Premade replacement heads suit users who prefer predictable installation and less hands-on work. Prebuilt coils installed in rebuildable decks offer a middle ground, retaining wick control without requiring every coil to be wrapped manually.
The real comparison is not simply the price of a replacement head against the cost of wire. Rebuilding requires time, consumables, equipment, inspection and a willingness to troubleshoot.
For an illustrative maintenance comparison, consider three hypothetical routines:
- A single-RTA user builds a new coil occasionally and changes cotton more frequently. Tool purchases are spread across repeated maintenance sessions.
- A user with replaceable coil heads avoids wire handling and wick preparation but depends on a supply of compatible replacement heads.
- A rebuildable user installs purchased prebuilt coils and prepares cotton separately, reducing coil-forming work while retaining responsibility for installation and resistance checks.
These are maintenance scenarios, not measured cost comparisons. Actual expenditure depends on component prices, replacement frequency, the lifespan of each build and the value placed on personal maintenance time.
Custom coils also introduce variability. Two visually similar hand-built coils may differ in leg positioning, connections or resistance. This flexibility can be useful for experienced users, but it requires consistent technique and compatible equipment.
Factory-made replacement heads provide a more standardised installation process, although manufacturing tolerances, product condition and device compatibility still matter. They are not immune to faults or dry hits.
Prebuilt coils designed for compatible RDA or RTA decks offer a useful compromise. They remove the wire-wrapping stage but do not eliminate trimming, securing the legs, checking resistance or preparing the wick.
For travel or situations where tools cannot be used conveniently, replaceable heads may be more practical. For home maintenance across multiple atomisers, rebuilding may offer greater flexibility.
Users who continue with rebuildable decks should give equal attention to cotton preparation. A properly positioned coil cannot deliver consistent performance if the wick does not supply liquid effectively.
How Do You Wick an RDA Without Causing Dry Hits or Excess Leaking?
Wick an RDA by using enough compatible cotton to contact the coil interior without compressing it excessively, then position the tails to support liquid delivery without obstructing the deck. Saturate the wick before operating the atomiser. Cotton density, tail length and liquid supply must suit the specific RDA because there is no universal measurement that prevents every dry hit or leak.
The central principle is controlled contact without excessive compression. Cotton should occupy the inside of the coil and move through it with light resistance during preparation. If pulling the cotton noticeably distorts the coil, the wick may be too tightly packed.
Conversely, insufficient cotton can leave areas of the heating surface without effective contact. Both conditions may contribute to uneven liquid delivery, although their symptoms can vary with coil design and operating power.
Tail preparation matters particularly in RDAs. The cotton must reach the liquid reservoir or juice well appropriately, but excess material can obstruct airflow, interfere with the chamber or prevent liquid from distributing through the wick as intended.
Deep juice wells may accommodate longer tails than shallow decks. Side-airflow, bottom-airflow and other chamber arrangements can also differ in how they tolerate accumulated liquid. This is why copying a wick length from an unrelated atomiser is unreliable.
Dry hits generally indicate that the heated material is not receiving enough liquid for the operating conditions. Possible causes include an insufficiently saturated wick, excessive cotton compression, inadequate liquid replenishment or operating conditions beyond the wick’s delivery capability.
A PubMed abstract of the 2024 dry-hitting toxicity study describes laboratory findings of increased cytotoxicity under the tested dry-hit conditions and thermal degradation of cotton wicks. The experiment does not identify an optimal RDA cotton density or quantify human health outcomes, but it reinforces the importance of avoiding inadequately saturated operation.
Before initial use, saturate the cotton thoroughly and allow liquid to distribute through the wick. Confirm that the chamber can be assembled correctly and that liquid has not accumulated where the particular atomiser design cannot contain it.
If burning occurs despite sufficient liquid being present, investigate cotton density, placement and the condition of the coil rather than simply increasing liquid quantity. If liquid escapes, examine overfilling, tail placement and the RDA’s airflow arrangement.
Do not continue operating a wick that shows signs of scorching or inadequate saturation. Stop, allow the equipment to cool and inspect the build before replacing affected material.
RDA maintenance offers direct access to the wick, but that convenience comes with regular attention to liquid replenishment. An RTA changes the balance by storing liquid in a tank around the rebuildable assembly.
Key takeaways before choosing an RTA
- Greater tank capacity does not guarantee longer use between refills; liquid consumption and operating conditions also matter.
- Access to the build deck, sealing quality and replacement wick requirements can affect day-to-day convenience more than the stated tank volume.
- Choose an RTA for your established maintenance and liquid-use habits, not simply because it appears to combine the advantages of a dripper and a tank.
Are RTAs Practical for Experienced Vapers Who Want Fewer Refills?
RTAs can be practical for experienced users who want fewer manual liquid top-ups while retaining control over coil installation and wicking. Their convenience depends on tank capacity, liquid consumption, sealing quality and maintenance access. An RTA can reduce the need to drip liquid repeatedly, but it does not guarantee fewer refills than every alternative tank system.
The relationship between tank capacity and refill frequency is straightforward: usable liquid capacity must be considered against actual consumption over time.
As a hypothetical example, two RTAs may have different tank capacities but also operate at different liquid-consumption rates. The larger tank does not necessarily last longer if its build consumes liquid substantially faster. This is an illustration of the variables involved, not a measured comparison between specific devices.
For a realistic assessment, record how much liquid a familiar setup uses during a typical day and compare that requirement with the usable capacity of a prospective tank. Coil configuration, operating power, puff duration and individual usage patterns can all affect the result.
Maintenance access is the next consideration. Some RTAs allow their build deck to be accessed while liquid remains in the tank, but this capability is model-specific. The Kayfun Lite manual illustrates such an arrangement; it does not establish that all RTAs support the same procedure.
Likewise, wick replacement and any permitted coil-cleaning procedure must follow the actual construction of the tank. Never assume that a filled tank can be safely opened, inverted or heated simply because another RTA permits a particular maintenance method.
Leaks and liquid-flow issues can undermine the expected convenience. Important design and maintenance variables include:
- Deck configuration: single-coil and dual-coil arrangements can impose different cotton-placement and liquid-delivery requirements.
- Airflow design: the location of airflow openings influences where excess liquid may escape.
- Seals and gaskets: damaged, displaced or worn O-rings can compromise sealing.
- Filling system: correct closure and the manufacturer’s filling procedure affect everyday reliability.
Experienced users with stable e-liquid preferences may appreciate an RTA because its tank reduces the need for repeated manual dripping. Frequent flavour changes can be less convenient, particularly when residual liquid remains inside the tank and wick.
An RDA may remain preferable where direct access to the coil and wick is the priority. A compatible replaceable-head tank may suit someone seeking less rebuild work. Neither alternative is universally superior; the choice depends on how liquid management and maintenance fit the user’s routine.
For the next maintenance session, check the current toolkit for worn cutters, incompatible screwdriver bits and missing resistance-checking equipment. Then compare the manufacturer’s instructions for the intended atomiser with the tools and skills already available, replacing unsuitable components before attempting another build.
Is an ohm reader necessary if a regulated mod displays coil resistance?
A suitable standalone resistance reader provides a separate checkpoint during assembly and may make it easier to inspect a build away from the intended mod. A regulated device’s resistance display can provide an additional comparison, but neither reading replaces visual inspection or compliance with the device manufacturer’s resistance and operating limits.
Can ordinary precision screwdrivers be used for rebuildable atomisers?
Yes, provided the screwdriver fits the post screw correctly, is clean and remains in good condition. The important characteristics are tip compatibility and controlled handling, not whether the tool is marketed specifically for vaping. Avoid worn bits and forcing a screw that does not engage normally.
Are ceramic tweezers electrically safe to use on a powered coil?
Ceramic tips can provide electrical insulation at the contact point when intact and used within their intended conditions. However, the entire tool should not automatically be considered electrically insulated. The safest general practice is to stop power before adjusting the coil and to follow the relevant equipment manufacturer’s instructions.
Should a coil be replaced whenever its cotton is changed?
Not necessarily. A compatible, structurally sound coil with stable resistance may remain serviceable through more than one wick change, subject to the wire and atomiser manufacturer’s guidance. Replace coils showing deformation, physical damage, unstable resistance or other signs that they are no longer suitable for use.
What is the most useful way to organise a rebuildable toolkit?
Separate clean wick materials from used tools and collected wire offcuts. Keep screwdriver bits, cutters, tweezers and resistance-checking equipment accessible in a protective case. Inspect tools before each session, store components dry and ensure batteries are protected from accidental contact with metal objects.