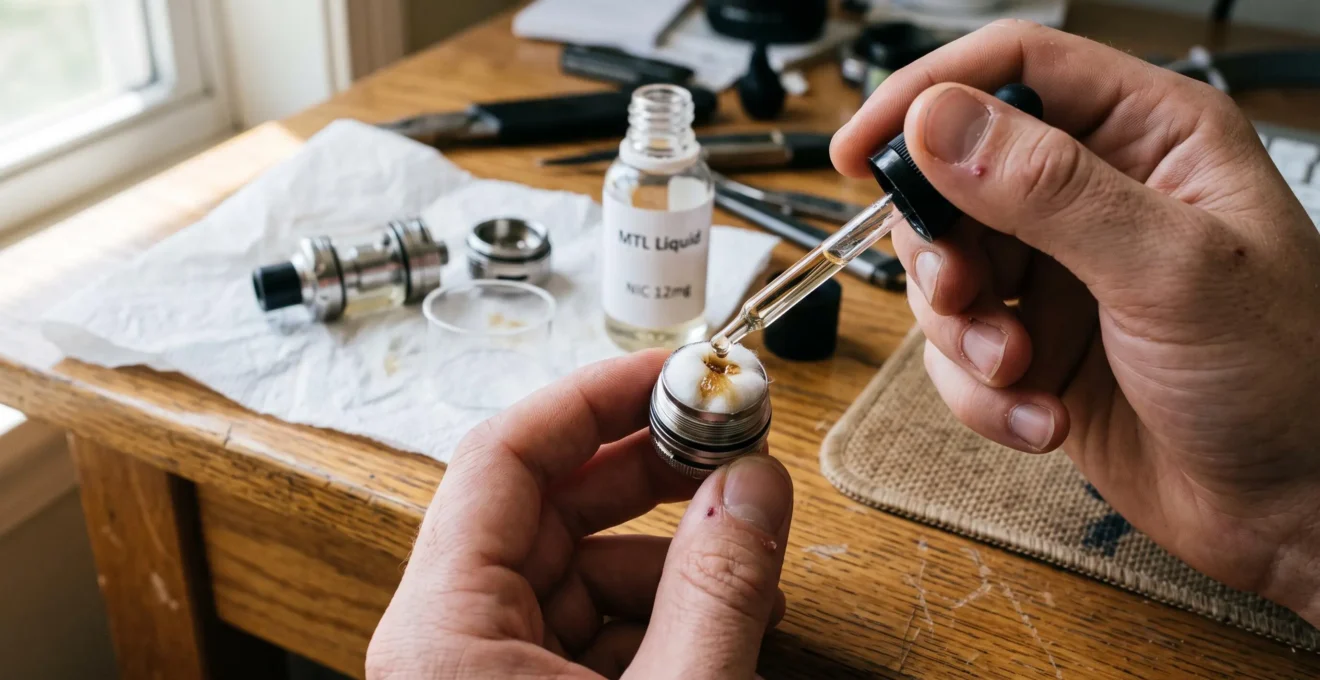
A replacement vape coil can develop a burnt taste on its very first puff if the cotton surrounding its heating element has not absorbed enough e-liquid. Priming prevents this avoidable problem by allowing liquid to reach the wick before heat is applied.
For compatible replacement coils, the usual procedure involves moistening the exposed cotton, installing the coil correctly, filling the tank and allowing sufficient time for saturation. The first puffs should then be taken at the lower end of the manufacturer’s recommended power range. Sealed pods and other integrated-coil systems may require a different approach, so the device instructions take priority.
The important distinction is between wetting the cotton thoroughly and flooding the coil’s central airflow channel. Too little liquid can cause overheating; too much in the wrong place can lead to gurgling, leakage or droplets entering the mouthpiece.
Understanding how the wick absorbs liquid also helps explain why different coils need different preparation times and why a new coil can still produce dry hits after apparently successful priming.
Vape coil priming: the essentials
- Moisten the accessible cotton before installation when the coil manufacturer permits manual priming, then fill the tank and allow the remaining wick to saturate.
- Keep excess e-liquid out of the central airflow channel and start within the lower part of the recommended wattage range.
- Adjust the waiting time to the coil design, liquid viscosity and manufacturer’s instructions rather than relying on one universal countdown.
- Why Does an Unprimed Coil Burn So Quickly on the First Puff?
- How Do You Prime a Replacement Coil Without Flooding the Tank?
- Pod Coil or Tank Coil: Which Usually Needs More Time to Saturate?
- Which Priming Mistakes Cause a New Vape Coil to Taste Burnt?
- How Long Should You Wait Before Using a Newly Primed Vape Coil?
- High Wattage or Poor Wicking: Which Is Causing Your Dry Hits?
- How Do You Replace a Vape Coil Without Causing Leaks or a Burnt Start?
- How Does an Atomizer Head Affect Everyday Vape Performance?
Why Does an Unprimed Coil Burn So Quickly on the First Puff?
An unprimed vape coil can develop a burnt taste almost immediately because its heating element transfers energy to cotton that has not absorbed enough e-liquid. Without sufficient liquid to carry heat away through vaporisation, local temperatures can rise sharply. This may damage the wick before liquid from the surrounding tank has time to replenish it.
Inside a typical replaceable atomiser head, an electrically heated metal element sits next to or within absorbent cotton. The cotton transports e-liquid towards the heating surface through capillary action: liquid moves through small spaces between the fibres and replaces what has been vaporised.
During normal operation, the available liquid absorbs substantial thermal energy. When the wick is dry or inadequately supplied, that cooling mechanism becomes less effective. The temperature can rise rapidly, potentially causing thermal degradation of the liquid or wick.
A systematic review in Frontiers in Physiology examining e-cigarette carbonyl emissions describes how insufficient liquid supply, inappropriate power settings and prolonged puffs can create overheating conditions. It also identifies the design of the atomiser and liquid viscosity as important factors.
However, an unpleasant dry puff does not automatically mean that every cotton fibre has been permanently scorched. Two situations need to be distinguished:
- Temporary insufficient saturation: the wick has not supplied enough liquid during a puff, but it may still be usable after sufficient saturation and correction of the operating conditions.
- Thermally damaged cotton: the wick has undergone physical or chemical deterioration. Adding more e-liquid cannot restore damaged fibres to their original condition.
An experimental study published in 2024 observed thermal decomposition of cotton wicks under dry-hit conditions. The researchers also identified increased cytotoxicity in their laboratory cell model when testing aerosols produced under those conditions. These results support avoiding dry hits, although the experiment does not establish how quickly every new commercial coil will be damaged.
The financial consequence is straightforward: a replacement coil damaged during initial use may need replacing again. The avoidable cost comes from losing a usable component, not from the few minutes needed to prepare it.
Liquid composition also matters. E-liquids with a higher vegetable glycerine (VG) proportion are generally more viscous than mixtures containing more propylene glycol (PG). A thicker liquid may move more slowly through a particular wick, increasing the importance of proper initial saturation.
Priming addresses the initial liquid shortage, but it cannot compensate indefinitely for excessive power, incompatible e-liquid or an atomiser whose wick cannot replenish liquid fast enough.
How Do You Prime a Replacement Coil Without Flooding the Tank?
Prime a compatible replacement coil by applying small amounts of e-liquid directly to its exposed cotton, including accessible side wicking openings, before installation. Allow the liquid to absorb rather than accumulate in the central airflow passage. After fitting the coil, fill the tank and wait for the remaining cotton to become saturated before activating the device.
The exact application points depend on the construction of the coil. Some have visible cotton inside the upper opening and several side ports; others have integrated or inaccessible wicks that must be saturated through the filled reservoir.
For coils designed for manual priming, the following procedure combines the common principles of manufacturer guidance:
- Prepare the equipment. Switch off the device or prevent accidental activation. Remove the new coil from its packaging and check its compatibility with the tank.
- Inspect the wick. Identify the exposed cotton inside the coil and any external liquid-feed openings. Do not attempt to dismantle a sealed coil head.
- Apply liquid gradually. Place small drops on the accessible cotton, allowing each to absorb before adding more. Avoid pouring liquid directly down the central airflow channel.
- Moisten the side openings. Where permitted, apply liquid to each accessible side wick so that saturation is not limited to the upper opening.
- Install, fill and wait. Fit the coil according to the device instructions, fill the reservoir without overfilling, and allow time for the cotton to saturate fully.
The OXVA Service Center’s instructions for extending coil life provide a concrete example of manual priming. Its procedure describes applying e-liquid to the internal cotton and side openings before installing the coil. The suggested drop quantities are specific to the documented method, not a universal dose for every replacement head.
The distinction between saturation and flooding is important. Properly primed cotton absorbs liquid within its fibres. Flooding occurs when excess liquid collects in spaces intended for airflow, including the coil’s central chimney.
Possible signs of excessive liquid include gurgling, liquid droplets reaching the mouthpiece and leakage from the airflow openings. These symptoms can also have other causes, including poor seals and incorrect assembly.
Where the cotton is visible, a change from a dry, pale appearance to a more uniformly moistened appearance can help indicate liquid absorption. However, surface appearance cannot confirm that the entire hidden wick is saturated. Waiting after filling remains necessary.
If excess liquid has entered the airflow channel, keep the device switched off and follow its cleaning instructions. Where the removable coil design permits, allow excess liquid to drain onto absorbent paper before reassembly. Avoid forcing liquid into electrical contacts.
Drawing on an unpowered device may help liquid move through some wicking systems, but it should not be treated as proof of complete priming. Inaccessible internal sections can remain insufficiently saturated.
Five checks before the first puff
- Confirm compatibility: match the coil model to the tank and retain the manufacturer’s specified power range.
- Inspect the cotton: identify all accessible liquid-feed openings and confirm that the wick is visibly undamaged.
- Prime without pooling: moisten accessible cotton where permitted and confirm that no obvious liquid reservoir has formed in the central chimney.
- Reassemble and inspect: check that the coil is properly seated, seals are correctly positioned and the tank has no visible leakage.
- Complete saturation: observe the prescribed waiting period and confirm that the intended initial power setting falls within the manufacturer’s recommended range.
Once the replacement is properly fitted, the remaining question is how long its particular wick architecture needs to absorb the liquid.
Pod Coil or Tank Coil: Which Usually Needs More Time to Saturate?
Neither pod coils nor tank coils consistently require a longer priming time. Saturation depends more on wick thickness, cotton density, liquid-feed openings, e-liquid viscosity and whether manual priming is possible. A sealed pod may need more waiting time because its wick is inaccessible, while a tank coil with exposed cotton can sometimes be prepared more directly.
The two formats differ in how users can reach the wick. Some refillable pods contain integrated heating elements and cotton enclosed within a cartridge. Their initial saturation happens mainly after the reservoir is filled. Many conventional tanks instead accept removable coil heads that expose part of the cotton before installation.
That distinction affects the preparation method, but it does not establish a universal ranking for saturation speed.
The comparison becomes more useful when the variables are considered individually.
| Factor | Integrated pod coil | Removable tank coil |
|---|---|---|
| Access to cotton | Often limited or inaccessible | Frequently accessible through several openings |
| Manual priming | May not be supported | Often possible when specified by the manufacturer |
| Wick saturation | Usually relies on liquid entering after filling | Can involve direct wetting followed by saturation in the filled tank |
| Time required | Depends on the cartridge design and liquid | Depends on wick construction, priming and liquid |
| Visual inspection | May be difficult with enclosed cotton | Can be easier where side wick ports are exposed |
Liquid viscosity can be more important than the pod-versus-tank distinction. A 70VG/30PG e-liquid generally has a higher VG content and greater viscosity than a 50VG/50PG mixture, although actual viscosity also depends on formulation and temperature.
More viscous liquids can move less readily through tightly packed cotton or narrow liquid-feed openings. A wick with generous access to the reservoir may therefore perform differently from a densely packed wick with smaller ports, even when the two use the same e-liquid.
For example, consider two hypothetical devices: a sealed pod filled with a relatively thick liquid and a removable tank coil with accessible cotton that has already been manually moistened. The tank coil might reach adequate saturation sooner. Reverse the wick construction and liquid compatibility, and the result could change.
Visible cotton should appear evenly moistened where inspection is possible, but a hidden wick cannot be assessed reliably from the outside. For sealed cartridges, follow the manufacturer’s filling and waiting instructions rather than attempting to force liquid into the assembly.
Even a fully saturated coil can subsequently taste burnt if its operating conditions prevent liquid from reaching the heating element quickly enough.
Which Priming Mistakes Cause a New Vape Coil to Taste Burnt?
The most common preventable mistakes are activating a coil before its wick has saturated, moistening only part of the accessible cotton, and immediately applying excessive power. Taking several long puffs without allowing liquid to replenish the wick can also produce a burnt taste, even when the coil was initially primed correctly.
These errors affect different stages of operation. Some create an immediate shortage of liquid; others gradually make the demand for liquid exceed the wick’s replenishment capacity.
Understanding the difference helps prevent repeated priming attempts when the underlying problem is actually the device setting or liquid compatibility.
- Skipping the initial saturation step. Activating a dry replacement head can cause rapid overheating because insufficient liquid is available to carry heat away. This may produce an immediate unpleasant taste and damage the wick.
- Wetting only one part of the cotton. On a coil with several accessible wicking ports, moistening the centre alone may leave other areas dry. Liquid needs to reach the cotton throughout the designed feed path.
- Starting at the maximum recommended wattage. High initial power increases demand on the wick. Where adjustable wattage is available, manufacturers commonly recommend beginning at the lower end of the specified range.
- Taking repeated or prolonged puffs. Consecutive activation can consume liquid faster than the cotton replenishes it, especially with viscous formulations or restricted feed openings.
- Attempting to dry-burn a disposable cotton coil head. Activating an unfilled replacement head to heat its metal element can damage the surrounding cotton. Techniques sometimes discussed for specialist rebuildable equipment must not be applied indiscriminately to commercial cotton-wicked heads.
The official Innokin troubleshooting guidance identifies inadequate priming, unsuitable power settings, frequent or prolonged puffs, liquid-feed problems and defective coils as possible explanations for burnt taste. It also recommends increasing wattage gradually from the lower end of the supported range.
A burnt taste should not automatically lead to another burst of power in an attempt to clear the coil. If the wick is inadequately saturated, additional heating may worsen the problem.
Instead, stop activating the device, inspect the liquid level and visible wick, and check whether the operating conditions match the manufacturer’s recommendations. If the taste persists after the liquid supply and settings have been corrected, replacement may be necessary.
Power adjustment cannot compensate for every defect. A poorly seated coil, an unsuitable liquid or a faulty component may require a different remedy.
Once those errors have been eliminated, the remaining practical issue is deciding whether the new wick has had enough time to saturate before its first activation.
How Long Should You Wait Before Using a Newly Primed Vape Coil?
There is no universal waiting time for every new vape coil. Manufacturer recommendations vary because wick construction, cotton density, manual priming and e-liquid viscosity affect saturation. Some guidance specifies several minutes, while other instructions recommend at least 15 minutes. The correct starting point is the procedure provided for the particular coil or cartridge.
The waiting period allows e-liquid to move through cotton that was not directly wetted during manual priming. Liquid entering through the outside ports must reach the inner sections adjacent to the heating element.
This process depends on capillary action and the characteristics of the absorbent material. A wick may appear wet at one opening while parts of its interior still contain insufficient liquid.
Two manufacturer examples demonstrate why a single countdown should not be treated as an industry-wide rule:
| Manufacturer guidance | Suggested waiting period | Important qualification |
|---|---|---|
| OXVA coil-care instructions | 5–10 minutes | After manual priming and filling, according to the documented procedure |
| Innokin troubleshooting instructions | At least 15 minutes | With the tank approximately three-quarters full, under the described conditions |
These are different manufacturers’ recommendations rather than results from a controlled comparison of identical coils. Neither establishes an exact safe time for all products.
The following considerations help interpret the instructions for a particular setup:
- Accessible, manually moistened cotton: direct application can assist initial absorption, although internal sections still need time to saturate.
- Sealed or inaccessible cotton: filling and waiting are often the principal means of saturation.
- Higher-viscosity e-liquid: liquid movement may be slower, depending on the wick design.
- Uncertain wick condition: when saturation cannot be confirmed, additional waiting is preferable to activating a potentially dry coil.
After completing the manufacturer’s waiting procedure, begin with a cautious initial use at an appropriate low setting if the device offers adjustable power. Do not operate below a minimum wattage explicitly required by the coil manufacturer.
If an unusual dry or burnt taste appears, stop immediately. Check the liquid supply, power and coil installation rather than taking further puffs to see whether the taste disappears.
The absence of visible dry cotton is helpful but not conclusive. An enclosed wick may remain insufficiently saturated even when the accessible openings look wet.
Once the initial waiting period has been respected, any subsequent dry hit should be investigated as a potential mismatch between the rate of heating and the wick’s ability to supply liquid.
High Wattage or Poor Wicking: Which Is Causing Your Dry Hits?
High wattage and poor wicking can both cause dry hits, but their symptoms may differ. A burnt taste from the first activation suggests inadequate saturation, installation problems or a defective coil. A dry hit developing after several closely spaced puffs may indicate that power demand exceeds the wick’s liquid supply. Neither pattern establishes a diagnosis on its own.
The underlying mechanism is a balance between energy input and liquid replenishment. Increasing wattage generally increases the rate at which available e-liquid is heated and vaporised. If cotton cannot supply fresh liquid quickly enough, portions of the heating surface may become insufficiently wetted.
The symptom pattern provides useful clues.
| Observed symptom | Possible explanation | Appropriate check |
|---|---|---|
| Burnt taste on the first activation | Insufficient initial saturation, incorrect installation or defective coil | Stop use; check priming, liquid level and component compatibility |
| Normal initial taste, then dry hits during consecutive puffs | Wick replenishment may be slower than liquid consumption | Check power, puff frequency and liquid suitability |
| Dry hits mainly at higher wattage | Energy demand may exceed the coil’s liquid-feed capacity | Reduce power within the approved range and reassess |
| Problems after changing e-liquid | Different viscosity or formulation may affect liquid supply | Check the coil manufacturer’s recommended liquid characteristics |
| Burnt taste persists after corrective checks | Possible wick damage or defective component | Stop using the affected coil and consider replacement |
A coil can operate satisfactorily at one supported wattage and produce dry hits at a higher setting. That does not necessarily mean its published power range is incorrect: puff duration, liquid formulation, airflow and the rate of successive puffs also influence real operating conditions.
The 2018 scientific review discussed earlier identifies liquid viscosity, wick construction and power delivery as interacting factors. High-VG liquids may reduce liquid-feed efficiency in some atomisers, especially those with small or restrictive wicking openings.
A temporary dry hit and persistent scorched taste also require different responses. If the wick is merely under-supplied, restoring adequate liquid flow and correcting settings may resolve the problem. If cotton has undergone significant thermal degradation, additional soaking cannot reverse that material damage.
Where there is a persistent burnt taste, repeated activation should be avoided. Continuing to use a potentially damaged coil is not an appropriate diagnostic method.
The same checks are valuable when installing a replacement coil, because leakage or an incorrectly fitted head can create additional problems before the new wick is fully saturated.
How Do You Replace a Vape Coil Without Causing Leaks or a Burnt Start?
Replace a vape coil by switching off the device, opening the tank as directed, removing the old head and checking the seals before installing a compatible replacement. Prime accessible cotton where the manufacturer permits, reassemble the tank without damaging its seals, refill correctly and observe the specified saturation time before use.
Coil replacement combines two separate tasks: achieving a leak-resistant seal and preparing the wick for heating. Completing only one does not guarantee that the assembled atomiser will function correctly.
Tank designs differ. Some allow a coil to be replaced while liquid remains in the reservoir; others need to be emptied or kept in a particular orientation. Trying to follow a different tank’s procedure can release liquid unexpectedly.
For a conventional removable-head tank, the replacement sequence is:
- Deactivate the device. Prevent the coil from heating during handling, then allow the atomiser to cool if recently used.
- Prepare the reservoir. Follow the tank’s instructions for retaining or removing remaining liquid. Work over absorbent paper.
- Remove the old coil. Open the appropriate section, then withdraw or unscrew the head using the intended mechanism.
- Inspect the sealing surfaces. Check O-rings, gaskets and contact areas for damage, dirt or incorrect positioning. Replace damaged seals with compatible components.
- Prepare and fit the new head. Check its model compatibility, prime accessible cotton where instructed, and seat the coil correctly without forcing it.
- Reassemble and fill. Ensure the tank is closed correctly, follow the filling instructions and avoid introducing e-liquid into the central airflow passage.
- Inspect before activation. Look for leakage around the base, joints and airflow openings; allow the coil to saturate before using the device.
Several faults can lead to leakage after replacement:
- A sealing ring may have moved, become twisted or been pinched during reassembly.
- The replacement head may not be fully seated or correctly aligned.
- Liquid may have entered the central airflow passage during filling or priming.
- A damaged seal or incompatible replacement component may prevent proper closure.
- Liquid characteristics may contribute to feeding or leakage problems in some designs.
A visual inspection of the seals and a check over clean absorbent paper can reveal obvious leaks before the device is placed in a pocket or bag. However, the absence of an immediate leak does not guarantee that one will not develop later.
The amount of liquid remaining in the tank should not be treated as a universal explanation for gurgling. Airflow design, pressure changes, fill level, sealing condition and liquid in the central chimney can all contribute, depending on the device.
Keep spilled e-liquid away from electrical contacts, clean it according to the manufacturer’s instructions and wash exposed skin after contact. Nicotine-containing liquids must be kept securely away from children and pets.
Replacing the head provides a convenient opportunity to establish a consistent sequence: inspect the seals, prepare the wick, install the component, fill the tank and wait. This combines leak prevention with protection against a premature burnt start.
A correctly installed coil should then be maintained through suitable power settings, compatible liquid and attention to changes in flavour or vapour production.
Key takeaways before everyday use
- Coil priming protects the initial wick condition, but long-term performance also depends on liquid replenishment during use.
- Check compatibility between the atomiser head, device settings and e-liquid before assuming that poor performance means the coil is worn out.
- Persistent burnt taste after appropriate troubleshooting is a reason to stop using the affected head rather than repeatedly reactivating it.
How Does an Atomizer Head Affect Everyday Vape Performance?
The atomiser head directly influences flavour delivery, vapour production and operating consistency because it contains the heating element and the wick that supplies e-liquid. Its design determines how efficiently liquid reaches the heated surface. Even a fully primed head may perform poorly if it is incompatible with the device’s power settings or the chosen e-liquid.
A typical replaceable atomiser head combines several components with distinct functions. The metal heating element converts electrical energy into heat. Cotton or another suitable wick material transports liquid towards that element, while the surrounding housing directs liquid and airflow through the intended paths.
Vapour production therefore depends on more than the battery. Available power, resistance design, wicking capacity and airflow interact to determine how the device behaves during each puff.
Correct priming helps establish the initial liquid supply, but it is only the beginning of the coil’s operating life.
Everyday performance changes can indicate several different problems. A gradual reduction in flavour, weaker aerosol at unchanged settings, persistent unpleasant taste or altered liquid consumption may suggest an ageing coil. However, the same signs can also arise from low battery charge, restricted airflow, unsuitable settings or a liquid-feed problem.
For this reason, replacement decisions should be based on multiple observations rather than a single symptom.
| Change noticed | What to investigate |
|---|---|
| Flavour gradually weakens | Coil condition, liquid level, airflow and device settings |
| Vapour production decreases | Power delivery, airflow, wick saturation and coil condition |
| Persistent burnt flavour | Potential wick damage, insufficient liquid feed or unsuitable wattage |
| Unexpected gurgling or leaking | Excess liquid in the airflow channel, seals, assembly and filling method |
| Dry hits after changing liquids | Viscosity, wick design and manufacturer compatibility guidance |
A higher resistance value or a physically larger coil does not, by itself, establish better flavour or longer service life. Performance depends on how the complete atomiser head has been designed and the conditions in which it operates.
Likewise, correct priming cannot make an unsuitable liquid compatible with every wicking system. If a coil struggles to replenish liquid at an otherwise permitted setting, changing the e-liquid formulation or using a compatible replacement may be more appropriate than increasing power.
There is no defensible universal number of days or puffs that every coil should last. Device design, liquid composition, operating power and patterns of use all affect deterioration. Manufacturer guidance and visible or sensory changes provide more useful maintenance criteria than an arbitrary replacement schedule.
The scientific evidence on dry-hit conditions reinforces the importance of maintaining an adequate liquid supply. It does not establish that priming eliminates the health risks associated with vaping, nor does it make vaping risk-free.
For adult UK users, coil maintenance is a device-care issue rather than a health benefit. Preventing overheating and avoiding damaged components are sensible precautions, but they should not be confused with evidence that inhaling aerosol is harmless.
Before using a replacement head, confirm its compatibility, follow the manufacturer’s priming and waiting instructions, inspect the assembled tank and check the supported power range. If an unexplained burnt taste persists, stop using the affected coil and replace or troubleshoot the component rather than continuing to heat it.
Can you use a new vape coil without adding drops directly to the cotton?
Yes, when the manufacturer specifies a fill-and-wait procedure rather than direct manual priming. Many sealed or integrated-coil cartridges are designed to absorb liquid from the reservoir. Follow the device-specific instructions and allow the prescribed saturation time before activation. Do not attempt to dismantle sealed components to reach the cotton.
Can you fix a burnt vape coil by soaking it in e-liquid?
Soaking may help a wick that was insufficiently saturated but has not been materially damaged. It cannot reverse significant thermal decomposition or restore scorched cotton. If a persistent burnt taste remains after correcting the liquid supply and settings, stop using the coil and consider replacing it.
Does a new vape coil always need the same VG/PG ratio as the previous one?
No. The suitable VG/PG ratio depends on the replacement coil’s wicking design and the manufacturer’s recommendations, not simply on the liquid used with the previous head. Higher-VG liquids are often more viscous, which can affect replenishment through narrower feed openings. Check compatibility whenever changing coil designs or liquid formulations.
Should you press the fire button to help e-liquid soak into a new coil?
No. Electrical heating does not replace the initial saturation process and can overheat cotton that remains dry. Allow the liquid to absorb according to the manufacturer’s instructions before activating the coil. Avoid applying dry-burning techniques intended for specialised rebuildable equipment to ordinary cotton-wicked replacement heads.
Why does a newly fitted coil gurgle even when it does not taste burnt?
Gurgling may indicate excess e-liquid in the airflow passage rather than insufficient cotton saturation. Overfilling, incorrect assembly, displaced seals or liquid introduced into the central chimney can contribute. Switch off the device, check the tank and follow its cleaning instructions. Persistent leakage or gurgling may require correcting the assembly or replacing a faulty component.