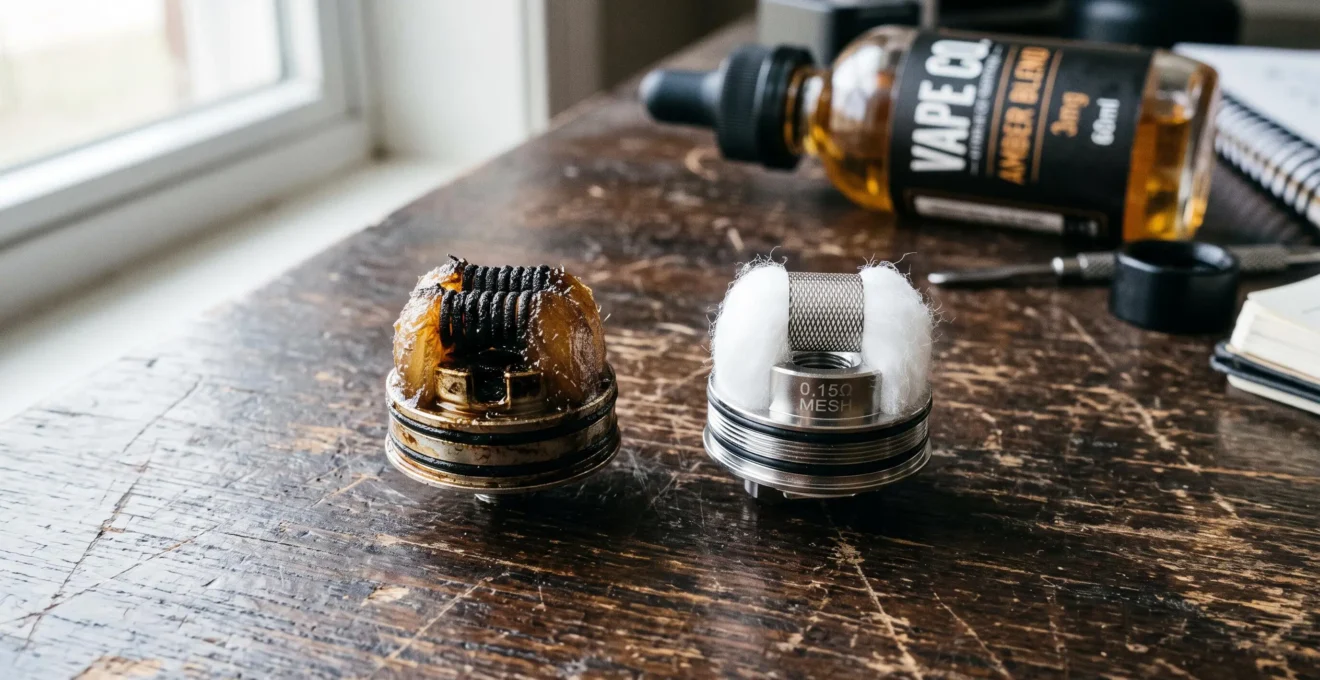
An atomizer head is the replaceable component inside many vape tanks that turns e-liquid into an inhalable aerosol. It combines an electrically heated coil or mesh with an absorbent wick, usually made from cotton. How efficiently these parts work together influences flavour delivery, vapour production, draw consistency and maintenance requirements.
When an atomizer head develops residue, loses its ability to transport liquid efficiently or operates outside its recommended power range, performance can become unpredictable. A burnt taste may indicate insufficient liquid reaching the heater, while gurgling or spitting can suggest excess liquid around it. Neither symptom automatically means the entire device is faulty.
Understanding the relationship between coil resistance, liquid viscosity, airflow and wattage makes troubleshooting more systematic. It also helps distinguish a head that needs replacing from a tank that simply needs correct assembly or adjustment.
For adult UK users, this is a technical maintenance guide rather than a claim that vaping is harmless. Aerosol composition depends on device conditions, and consistent vapour output does not establish consistent chemical emissions.
Atomizer head essentials
- The coil heats e-liquid while the wick continuously replenishes it; both processes must remain balanced.
- Leaks, spitting and burnt taste can result from assembly, saturation or power-setting problems rather than permanent coil failure.
- Choose compatible heads, follow their recommended wattage ranges and replace them when persistent performance changes cannot be resolved.
- Why Does an Atomizer Head Change Flavour and Vapour as It Wears?
- How Do You Replace an Atomizer Head Without Causing Leaks or a Dry Hit?
- Which Atomizer Head Suits a Lower-Power Versus Higher-Power Setup?
- Which Atomizer Head Mistakes Lead to Leaks, Spitting or Burnt Taste?
- When Should an Atomizer Head Be Replaced Before Performance Collapses?
- Standard Tank or RTA: Which Better Fits Users Who Prefer Simple Maintenance?
- How Do You Wick an RTA to Reduce Both Leaking and Dry Hits?
- How Should Adjustable Wattage Be Set for Consistent Coil Performance?
Why Does an Atomizer Head Change Flavour and Vapour as It Wears?
An atomizer head can change flavour and vapour characteristics as deposits accumulate on its heating surface and the wick becomes less effective at delivering e-liquid. These changes may affect heat transfer, liquid replenishment and taste. However, ageing does not necessarily cause a measurable reduction in vapour output, and symptoms vary between devices.
The heating element repeatedly encounters e-liquid containing propylene glycol, vegetable glycerine and flavouring ingredients. During operation, some ingredients can leave deposits on the metal surface. Sweetened or heavily flavoured liquids may contribute to visible accumulation, although the rate varies with formulation and operating conditions.
Deposits can alter the contact between liquid and the heated surface. Meanwhile, wick contamination, compression or thermal damage may interfere with capillary movement. When the wick cannot replace liquid as quickly as heating consumes it, localised overheating becomes more likely.
A scientific review of e-cigarette chemistry and wicking explains the importance of liquid delivery, heat transfer, coil condition and puff frequency in aerosol formation and thermal degradation.
Users may notice less distinct flavour notes, a different heating response or a harsher sensation. These observations can prompt inspection, but none is a reliable standalone measure of coil age or emissions. A perceived delay in vapour development may also arise from battery output or operating settings.
What experimental coil-ageing research found
A 2023 study published in Chemical Research in Toxicology examined electronic-cigarette devices, including a fourth-generation pod system tested from unused conditions through 5,000 puffs.
Within the investigated conditions, coil age did not significantly change measured temperature or aerosol mass within experimental uncertainty, but it substantially influenced several carbonyl emissions. Different compounds followed different ageing patterns. The findings do not provide a universal replacement interval or predict flavour quality across all atomizers.
This distinction matters: visible vapour is not a reliable indicator of aerosol chemistry. A head may continue producing aerosol even when its condition has changed.
Cleaning and replacement also address different problems. If a manufacturer’s instructions explicitly permit cleaning, removable surface contamination may sometimes be reduced. However, rinsing does not reliably remove baked-on deposits or restore burnt cotton, damaged mesh or deteriorated insulation. Many replaceable heads are not designed for thorough internal cleaning.
Liquid choice complicates assessment. Darker liquids can stain the wick, while strong flavours may make gradual taste changes harder to recognise. Rather than treating colour alone as proof of failure, assess several observations together and check the device’s maintenance instructions.
Once ageing is suspected, a correctly installed fresh head offers a useful comparison, provided the same compatible liquid and operating conditions are used.
How Do You Replace an Atomizer Head Without Causing Leaks or a Dry Hit?
Replace an atomizer head by following the tank manufacturer’s removal sequence, fitting a compatible new head correctly and allowing its wick to become fully saturated before firing. Check the seals, avoid forcing threaded components and begin at the lower end of the recommended power range. These precautions reduce common installation-related leaks and dry hits.
The procedure depends on whether the tank uses a screw-in head, a push-fit head or a removable base. Some designs can be opened with liquid remaining in the reservoir; others require the tank to be emptied first.
- Switch off the device and allow the tank and heating element to cool before handling.
- Check the tank design and lower the liquid level or empty the reservoir where necessary to avoid spilling during disassembly.
- Remove the base or access panel according to the manufacturer’s instructions. Keep the tank upright or inverted as specified for that particular model.
- Remove the old head and inspect accessible seals, threads and contact surfaces. Replace damaged seals only with compatible parts.
- Fit the new head squarely, ensuring it is fully seated without excessive tightening. Reassemble the tank and refill it as instructed.
Correct seating is especially important. A cross-threaded head can leave an unintended path for liquid, while a displaced seal may stop the tank from maintaining its intended separation between the liquid reservoir and airflow passage.
Priming means allowing e-liquid to penetrate the absorbent wick before normal heating begins. For compatible replaceable heads with accessible cotton ports, Innokin recommends approximately one drop on each exposed port, followed by sufficient soaking after filling the tank.
Its coil and tank troubleshooting instructions advise allowing at least 15 minutes for the liquid to soak into a newly primed head. This is manufacturer guidance, not a universal duration for every device. Thicker liquids and different wick structures may require different preparation.
After soaking, set adjustable power near the bottom of the head’s specified range. A cautious first puff provides an opportunity to detect a burnt sensation, unexpected gurgling or abnormal draw resistance before returning to the usual operating setting.
If the taste is immediately burnt, stop firing and check the preparation rather than repeatedly heating the head. If it gurgles, inspect for excess liquid, incorrect assembly or flooding. A burnt wick cannot reliably be restored through further priming.
Five-point atomizer replacement check
- Confirm the tank model and replacement-head compatibility; record the exact model or compatible part reference.
- Inspect the accessible seals and threads; identify any damaged component before reassembly.
- Seat the head according to its design; verify that it sits evenly without resistance suggesting cross-threading.
- Prime and soak according to the manufacturer’s instructions; confirm the specified preparation period has elapsed.
- Begin at the recommended lower power setting; record whether the first draw is clear, burnt, unusually tight or gurgling.
If a freshly installed head still behaves abnormally, first confirm compatibility and assembly before assuming that the replacement itself is defective.
Which Atomizer Head Suits a Lower-Power Versus Higher-Power Setup?
Lower-power setups generally suit compatible higher-resistance heads designed for modest aerosol production and more restrictive airflow. Higher-power devices generally use lower-resistance heads with greater liquid-delivery capacity and airflow. The appropriate choice depends on the manufacturer’s specified operating range, tank compatibility, preferred draw and e-liquid formulation—not resistance alone.
Electrical resistance, expressed in ohms (Ω), describes how strongly a coil opposes electric current. In regulated devices, operating power also depends on the electronics and applied voltage. Resistance therefore helps describe a head’s design but does not independently determine its ideal wattage.
Higher-power heads often have larger heating surfaces or more substantial liquid ports to support faster vaporisation. If liquid cannot reach the heater quickly enough, increasing power can create localised overheating rather than consistent performance.
The following comparison describes common design tendencies, not universal specifications.
| Selection factor | Lower-power setup | Higher-power setup |
|---|---|---|
| Typical head design | Often higher resistance | Often lower resistance |
| Airflow | Usually more restrictive | Usually more open |
| Vapour production | Typically lower volume | Typically greater volume |
| Liquid delivery | Designed for a lower vaporisation rate | Designed to replenish liquid at a faster rate |
| Liquid compatibility | Depends on the head’s specified wicking design | May accommodate thicker liquids if expressly supported |
| Primary check | Compatibility and recommended wattage | Compatibility, airflow and recommended wattage |
A device’s coil family often includes several options. The technical explanation of replaceable coils from Innokin identifies resistance, airflow and recommended wattage as relevant characteristics. It also explains the common association between lower-resistance heads and higher operating power.
Draw style changes the practical choice. A person preferring a tighter draw may favour a head engineered for restricted airflow rather than attempting to force a high-airflow head into that role. Conversely, a head intended for limited airflow may not support the liquid consumption and heating demands of an airy, high-power configuration.
Vegetable glycerine (VG) content also matters. Higher-VG e-liquids are generally more viscous, which can slow movement through some wick arrangements. However, compatibility cannot be established from a single VG percentage without considering the actual head.
The printed wattage range is an operating boundary, not a guaranteed flavour optimum. Start at its lower end and adjust cautiously within the stated limits, allowing the wick to replenish between puffs.
Using a high-power head at excessively low output may leave liquid incompletely vaporised, contributing to gurgling or spitting. Excessive power can overwhelm liquid replenishment and produce a burnt sensation. Neither outcome should automatically be attributed to a faulty device.
Once the head is properly matched to the tank and operating style, remaining problems are easier to diagnose as maintenance or setup faults.
Which Atomizer Head Mistakes Lead to Leaks, Spitting or Burnt Taste?
Leaks commonly involve displaced seals, damaged tank parts or incorrectly seated heads. Spitting often occurs when excess liquid reaches the heating area and is expelled as droplets. Burnt taste frequently indicates insufficient wick saturation, inadequate liquid replenishment or excessive power. Each symptom requires a different check, and several causes can overlap.
Diagnosing the symptom before adjusting the device avoids making a minor assembly problem worse.
| Symptom | Possible cause | First maintenance check |
|---|---|---|
| Liquid leaking outside the tank | Damaged seal, incorrect seating, cracked glass or filling error | Inspect the tank and reassemble according to its instructions |
| Gurgling or spitting | Flooded heating chamber, excess priming liquid or unsuitable operating power | Check for flooding and confirm the recommended settings |
| Burnt taste | Dry wick, rapid repeated puffs, excessive wattage or damaged cotton | Stop firing and inspect saturation and coil condition |
| Weak aerosol output | Incorrect setting, poor connection, low battery output or head deterioration | Check power, compatibility and electrical connections |
Spitting is particularly misunderstood. Liquid can collect around the heater and become rapidly heated, producing bubbles and ejecting droplets into the airflow. The effect depends on the amount of liquid present, heating conditions and the physical arrangement of the coil and chimney.
A small amount of popping is not necessarily a malfunction, but hot droplets entering the mouthpiece are a reason to stop using the device until the cause has been checked.
Overtightening is not a reliable way to stop leaks. It can damage threads or seals, depending on construction. A threaded head should engage smoothly and reach the seating position specified by its manufacturer. Unexpected resistance during fitting is a reason to stop and inspect the alignment.
Similarly, adding excessive priming liquid can flood the chamber. Priming is intended to wet the wick, not fill the airflow passage with free liquid.
When a tank repeatedly leaks after correct assembly, inspect the glass, seals, fill port and compatible coil design. A fault elsewhere in the tank can imitate a head problem.
With burnt taste, lowering power or allowing sufficient soaking may resolve an issue caused by operating conditions. However, persistently burnt cotton or damaged heating material indicates a more fundamental problem. Continuing to fire a compromised head is not a meaningful repair method.
A worn or poorly supplied wick can also influence the compounds generated during heating. The problem is therefore not limited to an unpleasant sensation or inconvenience.
If appropriate maintenance does not correct the fault, replacing the compatible head—and inspecting the tank if the problem persists—is more sensible than repeatedly increasing power or forcing components together.
When Should an Atomizer Head Be Replaced Before Performance Collapses?
An atomizer head should be replaced when persistent burnt or unpleasant flavour, visible wick damage or recurring performance problems remain after correct priming, assembly and power checks. Replacement should not depend on a universal puff count or number of days, because liquid composition, usage intensity, coil construction and operating conditions vary considerably.
Atomizer deterioration is not always sudden. Some people first notice a loss of flavour clarity; others experience gurgling, inconsistent draws or a persistent burnt sensation. A head may also continue producing substantial aerosol despite changes in its internal condition.
These signs should be interpreted together rather than as a fixed sequence:
- Persistent flavour deterioration: a recurring muted, stale or burnt taste after reasonable setup checks.
- Visible damage: accessible cotton that appears burnt or a heating element showing obvious physical deterioration.
- Repeated liquid-supply problems: dry or harsh draws despite an appropriate liquid level, power range and soaking procedure.
- Unresolved inconsistencies: changing performance that continues after checking assembly, device power and compatibility.
Liquid darkening around a head can be associated with residue and liquid circulation, but colour alone cannot establish that a head is unusable. Similarly, a reduction in visible aerosol is not a mandatory sign of ageing.
Usage frequency matters because each heating cycle exposes the coil and wick to thermal conditions. Puff duration and intervals between puffs influence how much time is available for the wick to replenish liquid. E-liquid formulations and power settings add further variation.
Research on coil ageing also demonstrates why a fixed schedule can be misleading. In the previously described experimental study, some carbonyl compounds reached their highest measured yields after approximately 500 puffs and then declined, while other compounds showed different patterns. That observation cannot be turned into a recommended 500-puff replacement interval.
There are practical costs to delaying replacement when a head is clearly deteriorating. Users may increase power or take repeated puffs to compensate for reduced perceived flavour, potentially worsening an existing liquid-supply mismatch. A persistently harsh draw also reduces the usefulness of further adjustments.
A simple self-assessment method is to keep the head specification and approximate installation date, note the liquid and normal wattage, then record meaningful changes when they appear. This helps identify personal maintenance patterns without pretending that every coil has the same lifespan.
Keeping a compatible spare head can make the distinction clearer. If a new, correctly primed head resolves the problem under comparable conditions, the old head was a likely contributor. If both behave similarly, the underlying fault may be elsewhere in the tank or device.
Replacement frequency also affects long-term maintenance effort, which becomes especially relevant when choosing between factory-built coil tanks and rebuildable alternatives.
Standard Tank or RTA: Which Better Fits Users Who Prefer Simple Maintenance?
A standard tank with replaceable factory-built heads usually offers simpler routine maintenance because its coil and wick are replaced together. A rebuildable tank atomizer, or RTA, requires users to install or maintain a coil and fit the wick themselves. An RTA provides greater control but introduces additional tasks, tools and potential assembly errors.
Both designs use the same underlying principle: liquid must reach a heated surface through suitable wicking material. The difference is who controls the heating assembly and its maintenance.
With a standard replaceable-head tank, the user primarily handles compatibility, priming, installation and replacement. With an RTA, the user also becomes responsible for coil installation, wick preparation, cotton placement and checks on the assembled build.
| Factor | Replaceable-head tank | Rebuildable tank atomizer |
|---|---|---|
| Routine maintenance | Replace the factory head | Inspect the build and replace or adjust the wick as necessary |
| Technical learning | Priming, compatibility and assembly | Coil installation, resistance checks and wick placement |
| Tools | Usually few additional tools | Appropriate build tools and testing equipment |
| Running costs | Recurring factory-head purchases | Recurring wire, coil and wick materials |
| Control over wicking | Mostly determined by manufacturer design | Adjustable by the experienced user |
| Error exposure | Mainly incorrect installation or operation | Additional build and electrical safety considerations |
Standard tanks are often more convenient when maintenance time is limited. Removing a used head and fitting a compatible replacement does not require the same level of manual adjustment as rebuilding a deck.
RTAs may appeal to people who enjoy technical maintenance and can verify electrical connections, coil resistance and safe installation. Once familiar with a particular deck, experienced users may find routine re-wicking manageable, but this does not remove the need for careful checks.
The financial comparison is less straightforward than the purchase price suggests. An RTA may require a higher initial outlay for the tank and suitable tools, while consumable materials can cost less per maintenance cycle. Standard heads avoid much of that work but create an ongoing replacement expense.
No universal cost saving can be claimed without considering local prices, maintenance frequency, materials and the value of the user’s time.
Rebuildable does not automatically mean easier or safer. Incorrect coil installation, electrical faults or poor wicking can introduce problems beyond those associated with replacing a preassembled head. For users unwilling to learn and verify the assembly process, factory-built heads remain the more practical option.
The distinction also changes troubleshooting. With standard heads, users mainly check manufacturing compatibility and installation. With an RTA, the wick density, length and placement become variables the user must evaluate directly.
For users choosing a rebuildable design, the next challenge is understanding how cotton placement affects liquid flow without creating flooding or dry heating.
How Do You Wick an RTA to Reduce Both Leaking and Dry Hits?
Effective RTA wicking balances liquid supply with flow control. The cotton must make appropriate contact with the heating coil while allowing liquid to reach it at the rate required during operation. Too much compression can restrict replenishment; poorly positioned or insufficient cotton can allow excess liquid into the chamber, causing flooding or leaks.
Unlike a factory-built atomizer head, an RTA allows direct adjustment of the wick. That flexibility also means the correct arrangement depends on the particular deck, liquid channels, chamber geometry and coil design.
The two opposing failure modes are important to distinguish. When cotton is excessively compressed inside the coil or packed too tightly into the liquid channels, liquid movement can become restricted. Heating may then outpace replenishment, particularly during repeated puffs or when using more viscous liquid.
When the wick does not adequately occupy the intended liquid-feed areas, uncontrolled liquid entry may flood the chamber. The result can be gurgling, spitting or leakage through the airflow openings.
Before installing cotton, the coil must be secure, correctly positioned and electrically suitable for the device. The resistance and condition of the build should be checked using appropriate equipment and the manufacturer’s safety instructions. A visibly damaged coil or uncertain electrical connection must be corrected before operation.
For a compatible and verified build, the general wicking approach involves threading suitable cotton through the coil, arranging the ends according to the deck’s design and ensuring the intended feed areas are neither obstructed nor left improperly exposed.
There is no universal cotton length or packing density that works for every RTA. The correct amount depends on the manufacturer’s deck design, and forcing cotton through the heating element can distort the assembly or restrict liquid movement.
Inspect the finished wick before reassembling the tank. Look for uneven contact, cotton obstructing intended openings or loose material that could interfere with the heating assembly. The wick should then be saturated according to the atomizer’s instructions before any powered operation.
After filling and allowing the wick to absorb liquid, begin cautiously within the coil’s safe operating limits. Unusual resistance, persistent gurgling or a burnt sensation indicates that the build should be checked rather than subjected to repeated firing.
Some manufacturers describe unpowered draws as part of a priming routine, but this is not a universal RTA requirement. The device-specific instructions should take precedence.
Liquid viscosity adds another variable. A high-VG formulation generally flows less readily than a thinner formulation, potentially making a tightly packed wick less suitable. A configuration that performs acceptably with one liquid may therefore require reassessment when the formulation changes.
Never use additional wattage to compensate for an inadequately supplied wick. More energy increases the heating demand without fixing the underlying restriction in liquid transport.
Even with well-positioned cotton, the device’s power setting must remain compatible with the heating element and the wick’s ability to replenish liquid.
Key takeaways before adjusting wattage
- Check the specified operating limits before changing settings; resistance alone does not establish a safe power level.
- Allow liquid replenishment to keep pace with heating, particularly when using viscous liquids or taking repeated puffs.
- Treat burnt taste, persistent spitting or changing performance as diagnostic signals rather than reasons to increase power automatically.
How Should Adjustable Wattage Be Set for Consistent Coil Performance?
Adjustable wattage should be set within the coil manufacturer’s recommended range, beginning near its lower end and increasing cautiously only when operation remains normal. The appropriate setting depends on the heating assembly, liquid delivery and airflow. Higher wattage can increase heating demand but does not guarantee better flavour, consistent aerosol chemistry or longer coil life.
Wattage represents the electrical power delivered to the heating element. As power increases, the coil can transfer energy to the surrounding liquid more rapidly, depending on its construction and operating conditions.
That greater heating demand must be matched by sufficient liquid replenishment. If the wick cannot transport liquid quickly enough, local dry regions and overheating can occur. The consequences may include an unpleasant burnt sensation and changes in aerosol composition.
For adjustable devices with manufacturer-specified operating ranges, a cautious calibration process is appropriate:
- Verify that the atomizer head or coil build is compatible with the device and has been correctly prepared.
- Identify the manufacturer’s recommended power range and begin near its lower end.
- After normal operation is established, adjust power in small increments while remaining within that range.
- Allow adequate time between puffs for liquid replenishment, particularly with thicker formulations.
- Stop increasing power if the draw becomes harsh, liquid spits into the mouthpiece or a burnt sensation appears.
Small changes in wattage may affect aerosol warmth, perceived flavour and vapour production. However, flavour perception is subjective, and the setting that feels strongest is not necessarily the one associated with the lowest chemical emissions.
An important distinction from the scientific evidence is that nominal wattage alone does not determine aerosol chemistry. Heating surface characteristics, liquid composition, wick effectiveness and local temperature distribution also matter.
As the head ages, previous settings may no longer produce the same experience. Deposits or changes to the wick can affect operation, but there is no universal rule that an older head requires more or less power.
If performance changes, inspect the liquid level, head condition, airflow and assembly before recalibrating. Increasing wattage in response to muted flavour may aggravate poor liquid supply rather than restore normal operation.
Persistent harshness or burnt taste at an otherwise appropriate setting is a reason to stop, check the equipment and consider replacing the head if deterioration is evident. A replacement head must still be correctly primed and operated within its own specified range.
For an RTA, electrical verification is particularly important. Adjustable wattage does not compensate for an unstable connection, damaged heating element or improperly constructed build. Any uncertainty about electrical safety should be resolved before use.
For the next maintenance cycle, record the compatible head model, its specified wattage range, the liquid used and any persistent symptoms. These observations can make future troubleshooting more accurate without relying on a universal setting or replacement schedule.
Can a worn atomizer head still produce normal amounts of vapour?
Yes. Experimental research has found situations in which coil ageing changed certain chemical emissions without significantly affecting measured aerosol mass. Vapour quantity alone cannot establish the condition of the coil, the quality of the wick or the chemical composition of the aerosol.
Can a burnt cotton wick be repaired by adding more e-liquid?
Adding e-liquid can correct insufficient saturation before damage occurs, but it does not reliably restore cotton that has already been thermally damaged. If a properly prepared head continues to produce a burnt taste and wick damage is suspected, replacement is the appropriate maintenance response.
Does an atomizer head need to match the same brand as the tank?
The head must be explicitly compatible with the tank’s design and electrical requirements. Brand names alone are not sufficient evidence of compatibility: even coils from the same manufacturer may belong to different product families. Check the tank documentation and the replacement head’s exact model reference.
Does a higher-VG e-liquid always require a higher-wattage coil?
No. Higher VG content generally increases viscosity, but suitability depends on wick structure, liquid-port dimensions, temperature and the manufacturer’s recommendations. Some heads designed for modest power may support particular thicker liquids, while others may not. Higher power does not overcome restricted liquid delivery.
Why does a new atomizer head sometimes leak immediately after installation?
A new head can leak because it is incorrectly seated, a seal is displaced, the tank is assembled incorrectly or excess priming liquid enters the airflow passage. Check the manufacturer’s assembly instructions, compatible parts and seals before attempting further use. Replacing a head cannot fix a cracked tank or another structural fault.